A Guide For Complete Time Attendance Setup

BioStar 2 TA is a time and attendance module that serves as an add-on for the BioStar 2 platform. The BioStar 2 TA module provides comprehensive time and attendance functionalities to BioStar 2. Combined with features such as multiple shift types and overtime rules, BioStar 2 TA simplifies complicated time and attendance management by offering flexibility for diverse applications.
Features Flexible and Easy management of Work Schedule, Setting up different shifts, giving option for Individual and Time attendance reports options along with Calendar view.
Biostar2 Software edition is free of cost which gives you a Time attendance feature as well but is limited to 100 users only, if your organization having user more than 100 you need to get the Biostar2 Time Attendance license as the number of users.

While purchasing the Biostar2 license Make sure to say BioStar2 TIME ATTENDANCE License when you order, because not just in time attendance Standard, Advanced and Professional are also in BioStar2 ACCESS CONTROL.
- License Activation (If required)
- Activating Time Attendance Module
- Register Devices.
- Time Attendance Dashboard
- Creating Time Code
- Creating Shift
- Creating Schedule Template
- Creating Rules (Optional)
- Add Users in Schedule.
- Check the reports with the format of the Available report.
License Activation (If required)
- For Activating the license simply just go to Setting and then click on Server.
- Here scroll a bit down and you will see the time Attendance section simply just put the Time Attendance license code and hit Activate.

Activating Time attendance Module
Once BioStar2 is installed, BioStar2 Time Attendance will require to be activated. For the very first time when you try to do the Time Attendance Setup, it's you required to Put the Login ID admin and type the Password, and click Register. After registration is completed, BioStar2 services will be restarted and the login page will be reloaded.
Register Device
Just after the time Attendance Module is activated, now Devices also need to be registered……
- Click on Time Attendance again & it will redirect to devise registration.
- Here Select the devices you want to use for the Time attendance and click on Register.

Time attendance Dashboard
After device registration you will be redirected to the actual This is the actual Time Attendance setup Page or you can say report page, which we can also say Time Attendance Dashboard, where we can add different – different filters for reporting purposes.
But before proceeding to Time attendance few points we need to take care of, we need to do an Actual Time Attendance setup by creating Time Code, Shift, Schedule Template, Rule, etc.

Once you are at this now, there are several more points you need to go through, like creating the codes, shifts, rules, schedules, etc.

Creating Time Code
By creating Time Codes, we decide what will be the name of our shifts, Leaves, etc, for example, Morning Shift, and Night Shift are my 2 Time Codes along with this I, can also create leave codes from here like Casual Leave(CL), Earned leave (EL) are my 2 leave codes.
- Go to Shift > Time Code, from here create the Time Codes.
- Attendance management: You can set the time code to be used for the T&A record.
- Overtime management: You can set the time code to be used for overtime.
- Leave management trips: You can set the time code to be used for going out, outside work, business trips, and vacations.
Note:- It's recommended to use separate -separate color codes for each and every shift.

Creating Shifts
Very first make sure Shift codes are created and if codes are ready we can create shifts and by shift, we actually decide what's your office/organization's timing, for adding the shift...
Go to Time Attendance > Shift, and from here create the Shift and decides the time accordingly.3 Types of Shifts can be created as per our requirement.
- Fixed : You can set the fixed service to attend and leave at a fixed time.
- Flexible : You can set the flexible service with no fixed attendance and leave times.
- Floating : You can set the floating service with no fixed attendance and leave times. In this shift type, the shift is automatically applied according to the attendance time.
All the Day, Evening, Night, etc. shifts can be created a form here, so make sure to use the Day Start Time Correctly.

Creating Schedule Template
By creating a Schedule Template you actually decide on which day which shift will be assigned, You can create a weekly and daily schedule template by using created shifts.
- Go to Time Attendance menu → Shift tab → Add Schedule Template,2 Types of Schedule Templates can be created as per our requirement.
- Weekly: Same shifts assigned to each day will repeat every week.
- Daily: Cycle of days (up to 90 days)
- Drag Drop the shifts from the right side.
- You can do Copy all.
- Delete the shift in case of Weekly off on the day.

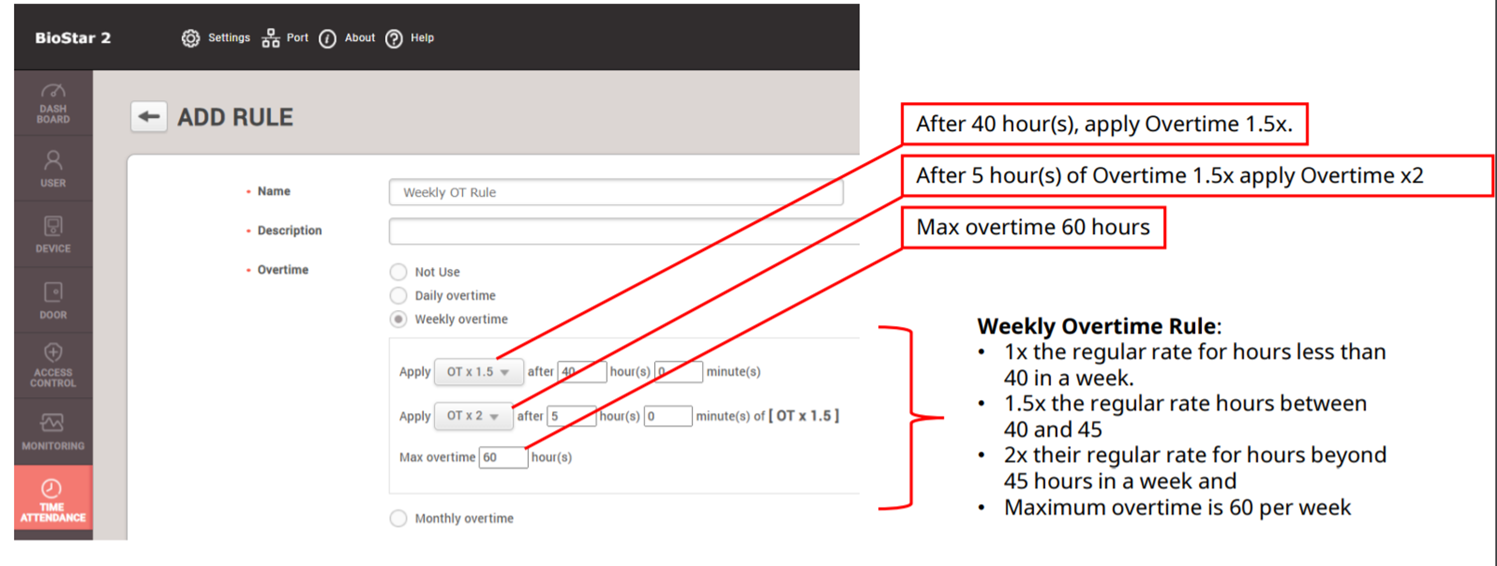
Creating Rule
Rules un Biostar2 can be used when the overtime time code has not been added to the shift. Overtime set in the shift has a start time and an end time, but the rule calculates the total time exceeding the range of regular working time. The rule can be used conveniently for managing total daily, weekly and monthly overtime hours, and when Rule is set, it applies instead of the overtime time code added to the shift, for creating the rules...
- Go to Time Attendance menu → Shift tab → Add Schedule Template
- Daily : Cycle of days (up to 90 days)
Creating Schedule
You can create a service schedule by assigning the set schedule template, overtime rule, period, and holiday to a user. You can also add a temporary schedule or personal vacation to the created service schedule. Multiple Schedules can be created as per the user groups. Before creating a schedule, check if the Time Code, Shift, Schedule Template, and Holiday which you will use have been created correctly
- Go to the Time Attendance menu → Schedule tab → Add Schedule
- Give a Name to schedule.
- Select Schedule Template which is already created.
- Now Select the Users and Click on Add Selected Users.
- Now Apply and Close.

Reports
Biostar2 is made for all the customers globally, and if you are looking for complete-time attendance and Payroll features then it's not for you, you can Connect with Us we will help you out, it has limited reports formats but all are enough, BioStar2 has 8 preset reports:
- Daily report
- Daily Summary Report
- Individual Report
- Individual Summary Report
- Leave Report
- Exception Report
- Edit History Report
- Working alarm time Report
There are a few Few points from the report section on Biostar2, which you must know before going to check the report...
Report Type : Change the report type from the 8 preset reports.
Column Setting : Hide/unhide columns and change the order.
User Group : Select user group/s to run the report.
User : Select user/s to run the report.
Save Filter : User/s & user group/s selected will be saved, so every time you open this report, no need to select them again.
Report Period : Daily, Weekly, Monthly, Custom: can’t exceed 3 months

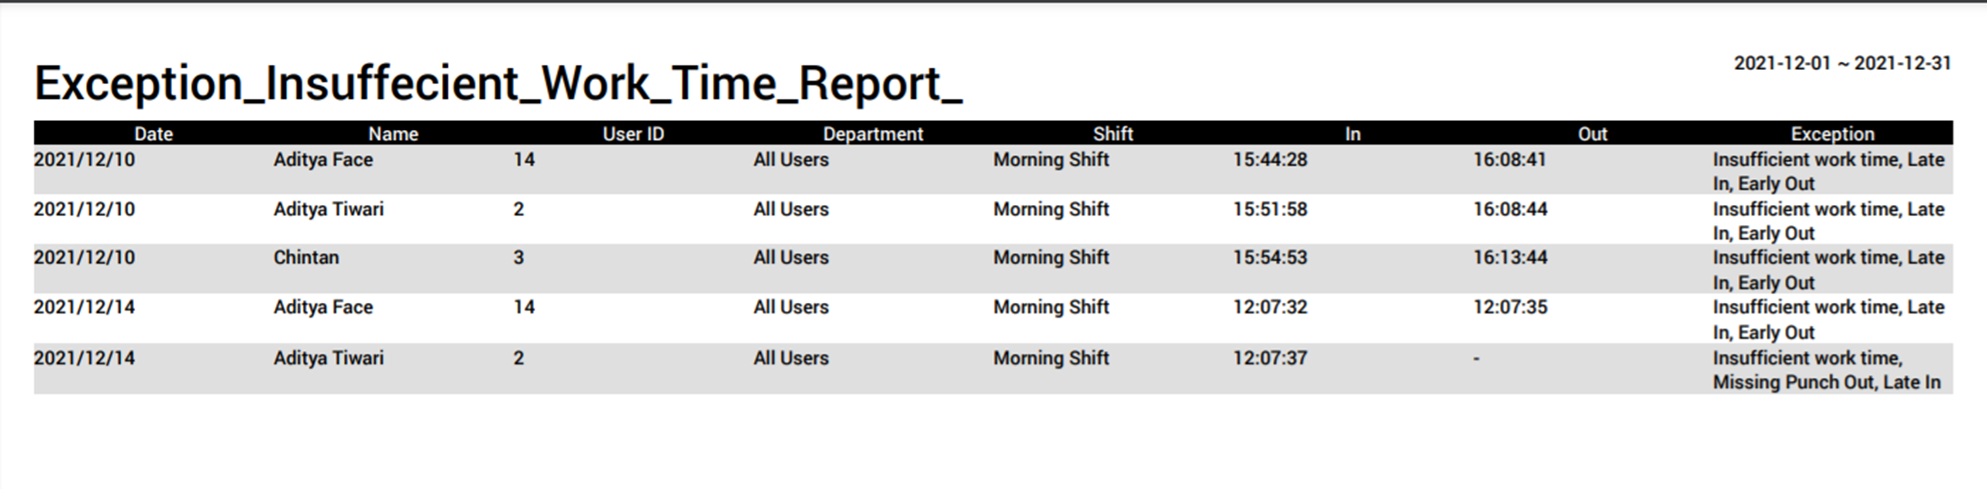
Below are Report formats ate Screenshots from the PDF reports, excel output may look different.
These are just a few sample reports from those 8 presets, more can be changed or extracted with available presets only. All the reports can be extracted daily, weekly, monthly, or custom.


Thank you for sharing such a useful article. I had a great time. This article was fantastic to read. Continue to publish more articles on, keep it up.
ReplyDeleteTime and Attendance Management Software